
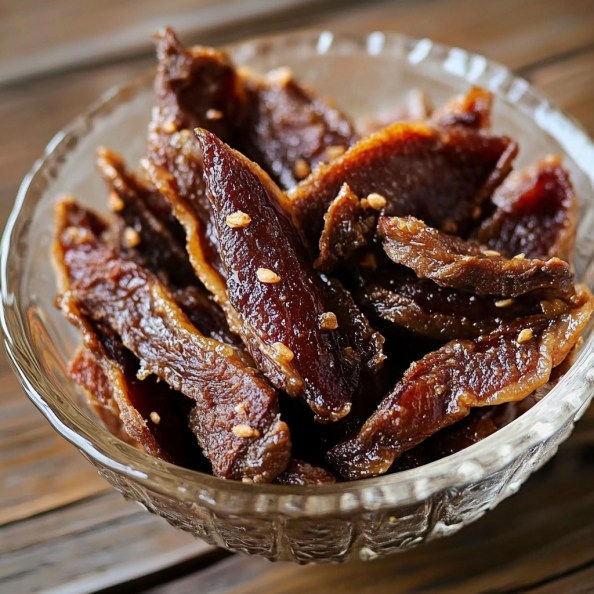
It all started on a crisp autumn evening, deep in the heart of my grandfather’s cabin. He was an avid hunter and had a knack for preserving meats in the most flavorful ways.
One day, he handed me a strip of jerky that was unlike anything I had tasted before—rich, smoky, and incredibly tender. “That’s duck jerky,” he said with a knowing smile. From that moment, I was hooked. I knew I had to master the art of making the perfect duck jerky recipe—and now, I’m here to share it with you!
Why You’ll Love This Duck Jerky Recipe
- Incredible Flavor – A perfect balance of smoky, savory, and slightly sweet.
- High in Protein – A nutritious, energy-boosting snack.
- Long Shelf Life – Perfect for storing and taking on hikes or camping trips.
- Customizable – You can tweak the seasoning to suit your taste.
- Easy to Make – With the right method, you can achieve restaurant-quality jerky at home.
Pro Tips for Perfect Duck Jerky
- Use lean duck meat – Fatty pieces can turn rancid over time.
- Slice evenly – Consistent slices ensure uniform drying.
- Marinate overnight – This maximizes the depth of flavor.
- Pat dry before dehydrating – Too much marinade can result in chewy rather than crispy jerky.
- Use a dehydrator – While an oven works, a dehydrator yields the best texture.
Ingredients List
For the Duck Jerky:
- 2 lbs duck breast, skin removed
- 1/4 cup soy sauce
- 1/4 cup Worcestershire sauce
- 2 tbsp honey
- 1 tbsp smoked paprika
- 1 tsp black pepper
- 1 tsp onion powder
- 1 tsp garlic powder
- 1/2 tsp red pepper flakes (optional, for heat)
- 1/2 tsp cure salt (optional, for preservation)
Instructions to Make Duck Jerky Recipe
1. Prepare the Duck Meat
- Slice the duck breast into thin strips (about 1/4-inch thick). For best results, slice against the grain.
2. Marinate the Meat
- In a large bowl, combine soy sauce, Worcestershire sauce, honey, smoked paprika, black pepper, onion powder, garlic powder, and red pepper flakes.
- Add the duck strips and coat well.
- Cover and refrigerate for at least 12 hours (overnight for the best flavor).
3. Dry the Meat
- Preheat your dehydrator to 160°F (70°C) or set your oven to its lowest temperature.
- Arrange the duck strips in a single layer on the dehydrator trays.
- If using an oven, place them on a wire rack over a baking sheet.
4. Dehydrate the Jerky
- Dry for 4 to 6 hours, flipping halfway through.
- The jerky is done when it is firm but still slightly flexible.
5. Store and Enjoy
- Let the jerky cool completely.
- Store in an airtight container for up to 2 weeks, or refrigerate for longer freshness.
Verdict on Delicious Duck Jerky!
Now that you have a foolproof duck jerky recipe, it’s time to bring this savory snack to life! Whether you’re preparing for an outdoor adventure or just craving a high-protein treat, this homemade jerky is sure to impress. So, grab your ingredients and start crafting your own perfect batch of duck jerky today!
Duck Jerky Recipe: A Flavorful and Protein-Packed Treat
Cheesy Vegan Pizza Beans is a delicious and satisfying vegan dish that is perfect for a quick dinner or a satisfying snack. Made with kidney beans, tomato sauce, and vegan cheese, this dish is packed with protein and flavor.
Ingredients
For the Duck Jerky:
Instructions
-
Slice the duck breast into thin strips (about 1/4-inch thick).
-
In a large bowl, combine soy sauce, Worcestershire sauce, honey, smoked paprika, black pepper, onion powder, garlic powder, and red pepper flakes.
-
Add the duck strips and coat well.
-
Cover and refrigerate for at least 12 hours (overnight for the best flavor).
-
Preheat your dehydrator to 160°F (70°C) or set your oven to its lowest temperature.
-
Arrange the duck strips in a single layer on the dehydrator trays.
-
If using an oven, place them on a wire rack over a baking sheet.
-
Dry for 4 to 6 hours, flipping halfway through.
-
The jerky is done when it is firm but still slightly flexible.
-
Let the jerky cool completely.
-
Store in an airtight container for up to 2 weeks, or refrigerate for longer freshne

Nutrition Facts
Servings 1
Serving Size 1
- Amount Per Serving
- Calories 90kcal
- % Daily Value *
- Total Fat 2g4%
- Sodium 400mg17%
- Total Carbohydrate 4g2%
- Protein 14g29%
- Iron 7 mg
* Percent Daily Values are based on a 2,000 calorie diet. Your daily value may be higher or lower depending on your calorie needs.
Note
You can also use other types of beans in this recipe, such as black beans or pinto beans.
Feel free to get creative and add your favorite pizza toppings to the mix!
